Access Your VM Instance Using PuTTY (Windows)
Once you have created a VM Instance using Horizon, you can access this VM Instance through a secure shell (SSH) using an SSH key pair. For Windows users, the CADES team recommends PuTTY. The PuTTY MSI installer also includes PuTTYGen, which allows you to convert a .pem private key file to a .ppk PuTTY key file.
If you would like to access your VM Instance over SSH from outside of the ORNL network, you must first create a firewall (SAFER) exception for this purpose. All local (within the ORNL network) SSH connections are permitted by default.
Add SSH Keys to a VM Instance
If you do not have any existing SSH key pairs, or you wish to generate a new key pair for your VM Instance, then you should use the Horizon web GUI to generate a new SSH key pair (Option 1). If you do have an existing key pair on your machine, then you can import the public key using the Horizon web GUI (Option 2).
In either case, you will need to log into the Horizon web GUI to associate your SSH key with your VM Instance(s).
Log in to Horizon
- Navigate to the Horizon web interface at https://cloud.cades.ornl.gov/.
- Log in with your UCAMS credentials.
- Domain:
ornl - Username:
Your three-letter UCAMS ID - Password:
Your UCAMS password
- Domain:
Option 1: Generate a New Key Pair
- Within Horizon, navigate to
Project→Compute→Access & Security→Key Pairs. - In the Key Pairs screen, click the
+ Create New Pairbutton.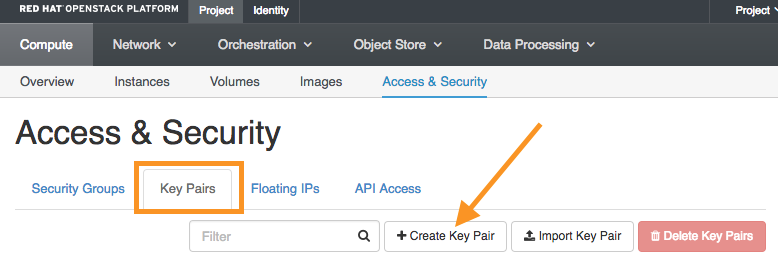
- In the resulting dialog, name your Key Pair, and click
Create Key Pairwhen you're finished. We went with blackmesakey in this example.

- The private key will be downloaded to your local machine as a
.pemfile. The public key will be stored in OpenStack. - Place the downloaded private key in a directory of your choosing, e.g.,
C:\Users\Username\SSH.
📝 Note: The private key is in a .pem format and has to be converted to a .ppk file using PuTTYGen.
Having completed the procedure above, you can now connect to your Instance using PuTTY.
Option 2: Import an Existing Key
If you have an existing key pair that you would like to also use for your OpenStack Project, then you can import the public key using the Horizon web GUI.
- Within Horizon, navigate to
Project→Compute→Access & Security→Key Pairs. - In the Key Pairs screen, click the
Import Key Pairbutton.

- In the resulting dialog, enter a key pair name in the
Key Pair Namefield. - On your local machine, locate your public key file and open it with a text editor.
- Copy the key to your clipboard using the text editor.
- Back in Horizon, paste the public key into the
Public Keytext box. - Click the
Import Key Pairbutton.

- Confirm your newly imported key appears in the Key Pair list.
Having completed the procedure above, you can now connect to your Instance using PuTTY.
Download and Install PuTTY
- Navitage to the official PuTTY download page.
- Download the appropriate MSI file for your Windows system (32 bit or 64 bit).
- Alternatively, if you don't want to "install" PuTTY on your system, you can download
putty.exeandputtygen.exefrom the "Alternative binary files" list and execute them as needed.
- Alternatively, if you don't want to "install" PuTTY on your system, you can download
- Run the PuTTY MSI installer. Note the destination directory.
- Confirm installation of PuTTY executables.
Connect to Your VM Instance Using PuTTY
Find Your Instance's IP
The IP address of your VM instance is shown in the Instances tab in the Horizon web GUI.
- Navigate to
Project→Compute→Instances. - From the Instances screen, you can copy the IP address for the desired VM Instance.

Convert Your Private Key to PuTTY Format
If you generated a key in the .pem file format, then you need to convert that key to the .ppk format using PuTTYGen.
- Locate and execute
PuTTYGen.exe. - Click the
Loadbutton.

- In the resulting dialog, navigate to the location of your key file.
- Select
All Files (*.*)to show.pemfiles in the dialog. - Select the appropriate key file and click
Open.

- When prompted by the success message, click
OK.

- Save the loaded key by clicking
Save private key.

- Using the resulting dialog, save the key in an intuitive place (e.g.,
C:\Users\Username\SSH).
Your key is now saved as a .ppk file that can be loaded directly into PuTTY, and we can now use PuTTY to connect to your VM Instance, without a password, using the "cades" username.
Connect to Your Instance
First we're going to load the .ppk key file into PuTTY.
- Locate and execute
PuTTY.exe. - In PuTTY's navigation pane, go to
Connection→SSH→Auth. - In the "Options for controlling SSH authentication" screen, click
Browse.

- In the resulting dialog, find your
.ppkfile, and clickOpen.
Your key file is now loaded into PuTTY. Next, we need to add your host information.
- In PuTTY's navigation pane, click
Session. - In the
Host Name (or IP address)field, enter the IP address of your VM Instance preceded by "cades" (e.g., cades@128.219.186.42). - Ensure that the
SSHradio button is selected and the port is set to22. - You can save this configuration by providing a name under
Saved Sessionsand clicking theSavebutton. This obviates the need to configurePuTTYfor your instance each time you want to access it. This name need not match the name of the instance on Horizon. - Click
Opento connect to your VM Instance using SSH.

- If prompted, you can choose to cache the server's fingerprint (click
Yes), not to cache the server's fingerprint for this session (clickNo), or to reject the connection outright (clickCancel). We're going to clickYes.

- You should now have access to your VM Instance's Bash terminal.
